With their cream cheese filling and coat of sugar, colorful red velvet cookies are a fun twist on the classic thumbprint cookie.
Our editors and experts handpick every product we feature. We may earn a commission from your purchases.
ⓘ
Christmas is all about traditions—Christmas baking included! Everyone has favorite cookie recipes, like spritz, gingerbread and cutouts. Thumbprints are also always popular on the holiday cookie tray. But every now and again, it’s fun to play with tradition and give the classics, including thumbprints, new flavors. Enter red velvet cookies with cream cheese filling.
These thumbprint cookies are similar to the standard jam-filled variety but with a red velvet twist thanks to a touch of cocoa powder, red food coloring and, of course, a dollop of cream cheese filling. They look festive and taste amazing.
Hey, baker! Come on over to Bakeable, our online baking community,
where you’ll find our best tips and top-rated recipes. Then, share your bakes in our Bakeable Facebook group. We’d love to see ’em.
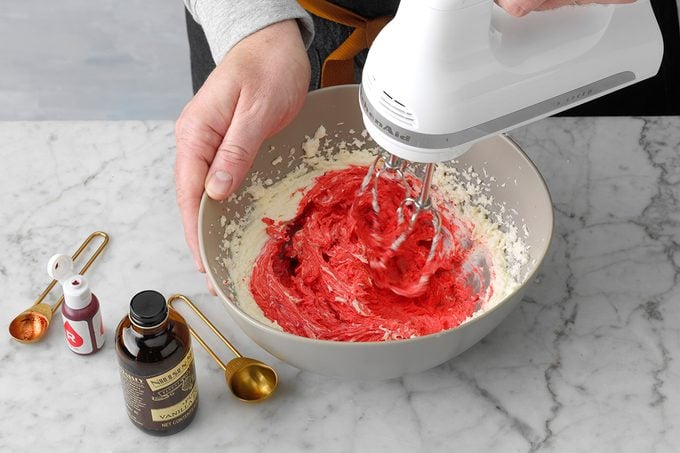
How to Make Red Velvet Cookies
Taste of Home
This recipe for red velvet cookies with cream cheese filling comes to us from Virginia baker Colleen Delawder who says they’re as delicious as they are pretty. Our Test Kitchen can attest! Here’s what you’ll need to make them for your cookie plate:
Whipping up these cookies is simple. Start by creaming together the butter and sugar. Don’t skimp on time here! Beat for at least 5 minutes until the mixture is very light and fluffy. This will give your cookies the best texture.
Next add in the egg yolk, vanilla and red food coloring and blend until combined.
In another bowl, whisk together the flour and cocoa. Slowly add the dry ingredients into your mix until combined.
Step 2: Roll into balls
Taste of Home
Roll the cookies into 1-inch balls. You can use a cookie scoop to help portion and then roll by hand to get the right shape.
Once you’ve made the balls, give them a roll in some coarse sugar. If you don’t have sanding sugar on hand, regular sugar will do—but coarse sugar gives the cookies a bit more crunch and looks like sparkling frost.
Step 3: Make the thumbprints and bake
Taste of Home
Place the cookies two inches apart on a baking sheet lined with parchment paper. Then, using the back of a 1/2 teaspoon measuring spoon, press a well into each cookie. You can use your thumb if you want to stay true to the thumbprint moniker, but the spoon makes a more uniform shape.
Once shaped, pop the cookies into a 300ºF oven for 10 minutes. While they bake, work on the next step.
Step 4: Whip up the cream cheese filling
Taste of Home
To take your red velvet cookies from good to great, you’ll need to whip up a quick cream cheese filling. The filling is simple: Just use your hand mixer to beat together the softened cream cheese, sugar, vanilla and salt until well blended. That’s it!
Step 5: Fill and bake again
Taste of Home
Now, it’s time to fill. If the indentations in your cookies don’t look as deep as they did going into the oven, you can always reshape them with the back of the spoon.
Fill each well with a teaspoon of filling, then put the tray back into the oven for 10 to 12 minutes. Once baked, let the cookies cool on a wire rack.
Serving and Storing Red Velvet Cookies (and All Your Holiday Cookies)
Taste of Home
These red velvet thumbprints are the perfect addition to any holiday cookie tray and will go fast at the next cookie exchange. Like all Christmas cookies, they look gorgeous nestled onto a pretty holiday platter or packaged up with a bow.
If you’re saving the cookies for Santa or just a little closer to Christmas, be sure to keep them in an airtight container. You can even bake these a month in advance, freeze them and defrost later. Just follow our Christmas cookie storage tips.
Try All Our Favorite Thumbprint Cookies
1 / 30
Red Velvet Thumbprint Cookies
These festive sugar-coated red velvet cookies are perfect for Christmas. They're just as delicious as they are beautiful. —Colleen Delawder, Herndon, Virginia
Go to Recipe
Raspberry Pistachio ThumbprintsThumbprint cookies are a Christmas classic, and I especially like my updated version with pistachios. The rich, buttery bites are not only delicious, but they are also pretty enough to give for gifts—if you manage to share them! —Laura Murphy, Columbus, Mississippi
Baklava Thumbprint CookiesThe topping on my sister-in-law's peach cobbler was so delicious that I asked for the recipe; then I decided to use that to top a cookie I developed with the flavors of baklava. My adult son tried one and immediately ate two more—which is unusual for him! It's a good recipe to mix up the night before and bake fresh the next day for company. —Sharon Eshelman, Harrington, Delaware
Jeweled Coconut DropsRed raspberry preserves add a festive flair to these tender coconut cookies. Perfect for potlucks and cookie exchanges, these shaped cookies never last long when I make them for my husband and two sons. -Ellen Marie Byler, Munfordville, Kentucky
Carrot Spice Thumbprint CookiesCarrot cake is a family favorite, and these delicious cookies with shredded carrots, dried cranberries, toasted walnuts, cinnamon and cloves taste very similar. They’re even topped with a rich cream cheese frosting. With each cookie it feels as if you’re eating a piece of carrot cake, but no fork is needed! —Susan Bickta, Kutztown, Pennsylvania
Berry Shortbread DreamsRaspberry jam adds fruity sweetness to these rich raspberry-filled shortbread cookies. They will absolutely melt in your mouth! —Mildred Sherrer, Fort Worth, Texas
Coconut Key Lime ThumbprintsThis is the cookie recipe I created for the Las Vegas World Food Championships in 2013. It's similar to a shortbread thumbprint cookie, but with lots more personality. —Amy Freeze, Avon Park, Florida
White Chocolate Raspberry ThumbprintsWhen I pass around the cookie tray, all eyes land on these fancy thumbprints. The white chocolate filling and dab of jewel-toned jam will satisfy even the most discriminating sweet tooth. —Agnes Ward, Stratford, Ontario
Thumbprint Butter CookiesThese buttery little rounds add beautiful color to a platter of treats. Fill the thumbprint in the center with any fruit preserves you like. —Taste of Home Test Kitchen
Sweetheart CookiesThese rounds filled with fruit preserves were blue-ribbon winners at the county fair two years running. A family favorite, they never last beyond December 25! —Pamela Esposito, Smithville, New Jersey
Chocolate Chip & Cookie Butter ThumbprintsI wanted to make a more festive version of chocolate chip cookies for the holidays. Since my mom's thumbprints are what I look forward to most, I decided to combine the two. —Crystal Schlueter, Northglenn, Colorado
Sacher Torte CookiesThis cookie recipe will be a hit whether you are making it for your family or for a potluck. Apricot is traditional but you can choose whichever fruit preserves you prefer.—Audrey Thibodeau, Gilbert, Arizona
Red Velvet Peppermint ThumbprintsRed velvet cookies and cakes are so pretty, but I always wish they had a bigger flavor. I infused these thumbprints with a peppermint pop. —Priscilla Yee, Concord, California
No-Bake Chocolate Hazelnut ThumbprintsYears ago, a friend gave me a recipe for chocolate peanut treats that didn't require baking. I thought it was a quick and clever way to whip up a batch of sweet snacks without heating up the kitchen, and I started making different variations. This one includes luscious Nutella and crunchy hazelnuts. Yum! —Lisa Speer, Palm Beach, Florida
Poppy Seed ThumbprintsMy oldest son is a huge fan of these thumbprints, so I make sure they're on my baking list every Christmas. Lemon zest and poppy seeds help give this crisp cookie fantastic flavor. —Kelly Pember, Wheeler, Wisconsin
Pecan Pie ThumbprintsA good buttery dough and nutty filling take time to make, but the results are so worth it. After munching on a few, I think you'll agree.— Peggy Key, Grant, Alabama
Jam Thumbprint CookiesWhen I was four, Mom and I would don our aprons and I would pretend we were bakers named Marge and Betty. Though we dropped that routine, we still make Christmas cookies together every year. —Rebecca Little, Park Ridge, Illinois
Chocolate-Covered Cherry ThumbprintsWhen I dig out my best cookie recipes, I'm reminded of baking with my children when they were little. These thumbprints with cherries elicit such sweet memories. –Deborah Puette, Lilburn, Georgia
Flourless Peanut Butter ThumbprintsI had been searching for a dessert to make for my brother's girlfriend (who is gluten intolerant), and I came across a naturally gluten-free dessert—a flourless peanut butter cookie. After tweaking the recipe a bit and adding Nutella and a sprinkling of sea salt, I finally found the perfect cookie for her. —Dana Hinck, Pensacola, Florida
Jeweled ThumbprintsWhen I moved here from Malta more than 20 years ago, a kind neighbor lady took me under her wing and baked many cookies for me. This is one of her recipes that I treasure. —Maria Debono, New York, New York
Chocolate Thumbprint CookiesMy group of friends had a weekly "movie night" during winters on Martha's Vineyard, and we'd take turns making a chocolate treat to share. These terrific chocolate thumbprint cookies were an instant success. Once they debuted, I had to make them many more times. —Laura Bryant German, W. Warren, Massachusetts
Apricot-Pecan Thumbprint CookiesI enjoy experimenting with cake mixes to make new cookie recipes. I love apricot, but feel free to fill the thumbprint in the center of these goodies with any fruit preserve you like. —Nancy Johnson, Laverne, Oklahoma
Eggnog ThumbprintsThese cute cookie bites always get a recipe request. They make special holiday gifts and freeze well, too.— Mary Ann Ludwig, Edwardsville, Illinois
Chocolate Caramel ThumbprintsCovered in chopped nuts and drizzled with chocolate, these cookies are delicious and pretty. Everybody looks forward to munching on them during the holidays. —Elizabeth Marino, San Juan Capistrano, California
Festive ThumbprintsI never cared for jam-filled thumbprints, so I decided to fill them with frosting instead. This makes them easy to ship, which you can’t do with the sticky jam filling. I sent these to my daughter while she was serving in Iraq, and they made the long haul in perfect condition. —Wendy Schlueter, Babbitt, Minnesota
Apricot-Pecan Thumbprint CookiesI enjoy experimenting with cake mixes to make new cookie recipes. I love apricot, but feel free to fill the thumbprint in the center of these goodies with any fruit preserve you like. —Nancy Johnson, Laverne, Oklahoma
Lisa is a former Taste of Home editor and passionate baker. During her tenure, she poured her love of all things sweet (and sometimes savory) into Bakeable, Taste of Home's baking club. Lisa also dedicated her career here to finding and testing the best ingredients, kitchen gear and home products for our Test Kitchen-Preferred program. At home, you'll find her working on embroidery and other crafts.
We are no longer supporting IE (Internet Explorer) as we strive to provide site experiences for browsers that support new web standards and security practices.
 Updated: Jun. 01, 2023